Retrieve password for PRO3/PRO/SCANPAD, CRP129 and CRP229(Ver.1.01)
1. For CRP-129, if you’ve never changed the default password, you can follow the next procedures to look up the default login name and password from the Help section of the CRP-129 itself.
1.1 Power up the tool, place the curser on Help icon and press OK button.(Figure 1)
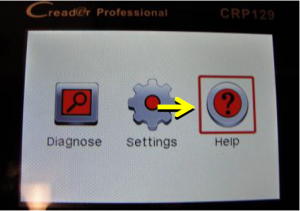
Figure 1
1.2 Select Tool Information press OK. (Figure 2)
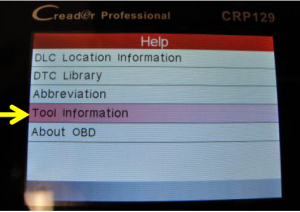
Figure 2
1.3 The default username should be CRP conjuncts with the S/N, for example in Figure 3, the login name is CRP965090000012; The default password is the Register Code, which is 41002e000d47 in Figure 3 for example.
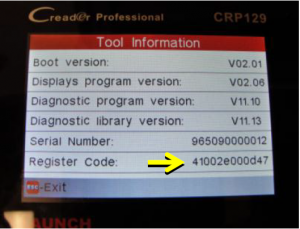
Figure 3
1.4 If you’ve already changed the password and forgot it, please see next step.
2. The follow steps of how to retrieve the password is applied for CRP129, CRP229 and SCANPAD.
2.1 Start a web browser in your computer, visit www.dbscar.com , click Log in button on the top right of the webpage, then will come up a login page. (Figure 4) Then click on the link Forget password. (See red arrow)
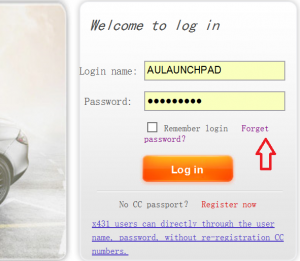
Figure 4
2.2 There are 3 ways to find back password which are by password protection question, by mobile phone (doesn’t work outside China) and by E-mail box. (Figure 5)
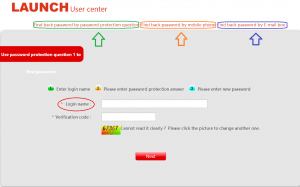
Figure 5
2.3 To use Find Back Password by Password Protection Question, you need to setup Password Protection Question beforehand, otherwise you will get a warning message(Figure 6) .To see how to setup Password Protection Question please refer to Annex A. If you forgot the Login name, please refer to 2.5.
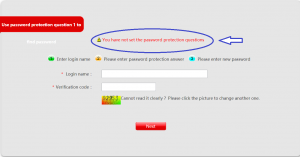
Figure 6
2.4 Type in Login name and Verification code, then click on Next button, then answers the 3 Protection Questions correctly, and then it will come up a new page (Figure 7). You can enter new password then confirm new password on this page. Mission accomplished!
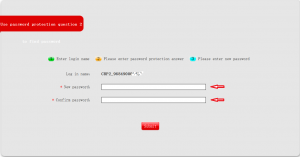
Figure 7
2.5 If customer even forgot the Login name, try default login name. For CRP-129, the default login name is CRP+S/N, like CRP970795001234 for example; For CRP-229, the default login name is CRP2_+S/N, for example CRP2_968490001234; For SCANPAD, and there is no default login name. You can try the default login name, but since it can be altered by customer, sometimes it is not necessary working.
2.6 Find Back Password by Email Box, the login name can be the username, CC account or Bonded Email (Figure 8). To use the Bonded Email as Login name, customer has to bind their email beforehand. To find out how to bind customer email to the account, please refer to Annex B.
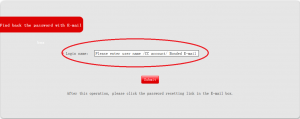
Figure 8
2.7 After click Submit button (Figure 8), a reset link will send to the customer email (Figure 9), if the customer can’t find the email, please check the junk mail box, some email supplier may put the email in it.
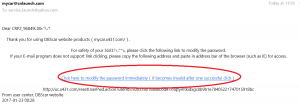
Figure 9
2.8 After click the link, a message box will come up, simply close the message box, Then customer will receive another email giving you the CC number and the new password (Figure 10). Mission accomplished!
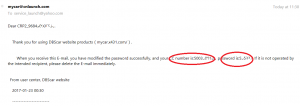
Figure 10
2.9 If you still can’t retrieve the password by the above procedures, please email service_launch@yahoo.com ask for help, please kindly include the S/N of the machine in the email.
3. Appendix A, How to setup Password Protection Question.
3.1 Firstly, login the customer account with username and password (Figure 4).
3.2 Click on User Info maintenance (Figure 11).
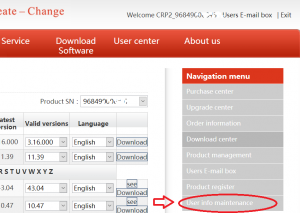
Figure 11
3.3 Pick 3 questions and answer to the questions, click Submit button (Figure 12). Mission accomplished! The customer protection questions are set!
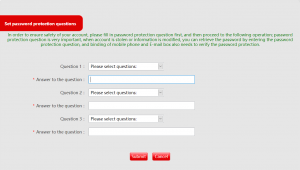
Figure 12
4. Appendix B, How to bind your email to your account.
4.1 Firstly, login the customer account with username and password (Figure 4).
4.2 Click on User Info maintenance (Figure 11).
4.3 You can see email box condition is unbound, click on Bind E-mail box (Figure 12).
Note: After the email is bound, the customer CANNOT change it anymore, so better use a permanent email address to bind.
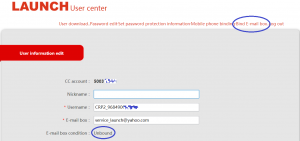
Figure 12
4.4 Then the customer will receive a email, if not, look for it from junk mail box, click on the link in the email (Figure 13).

Figure 13
4.5 It will come up a message box, simply click on Close button, the email is bound successfully!(Figure 14).

Figure 14
Step 2